
Easy Crusty French Bread (w/ Yudane Method)
Easy, low knead crusty bread.
Yield: 1 loaf
15 minutes 1 hour 30 minutes
Bread
Submitted by Siobhan Green
Ingredients
- 2 ¼ teaspoons active dry yeast (9 grams)
- 1 teaspoon sugar (4 grams) (use honey if you prefer)
- 1 ¼ cups warm water (300 grams) or warmed milk (min 100° max 110°f)
- 1 ¼ teaspoons (8 grams) kosher salt
- 2 ½ to 3 ½ cups bread flour (400 grams) plus extra for dusting (see recipe notes)
- YUDANE
- if using the yudane method, replace water/milk with
- 1 cup boiling water plus 1/2 cup warm milk or water (min 100°F)
Directions
MIX THE DOUGH & FIRST RISE (1 HOUR)
REG: Combine yeast, sugar, and warm liquids in a large mixing bowl (you can also use a stand mixer fitted with a paddle and - later - a dough hook).
YUDANE: in separate bowl, combine 1 cup flour with 1 cup boiling water. Mix until a thick paste is formed. Set aside and let cool.
Combine yeast, sugar, & rest of water as above.
ALL: Let the yeast proof for about 5 minutes, until the mixture is foamy.
YUDANE: test temperature of paste - if under 120° (ideal is 110°f), add to yeast mixture and mix well.
ALL: Add salt and 2 1/2 cups (1 1/2 cups if using Yudane) flour to bowl. Mix with a sturdy spatula or paddle on mixer until the dough starts to come together, mix until all ingredients are incorporated. For best results, mix until no dry bits of flour remain (use a dough hook if using a mixer)
Note: This is a relatively slack (wet) dough, so it may seem a bit shaggy and sticky at this point. Don’t worry – it will become more smooth and elastic as we go!
Take temp of dough - ideal is 80 to 90°. Cover bowl with a clean damp, warm tea towel and let rise on the counter for about 1 hour, until dough has doubled in size. If the room is colder than that, preheat oven to the lowest temp and then turn off, setting dough bowl in with door open.
SHAPE THE DOUGH & FINAL RISE (30 MIN)
When dough has risen, lightly flour a large cutting board.
Tip the dough out of the bowl and onto the cutting board. DO NOT PUNCH THE DOUGH DOWN – you want to keep all those nice air bubbles intact so you have an airy, delicious loaf of bread. (Note: If the dough is sticking to the bowl a little bit, wet your hand with a bit of cold water and gently separate the dough from the bowl to get it all out).
Shape the dough into a round loaf: Pull each corner of the dough in towards the center (like you’re folding an envelope) and repeat until the dough feels tight and begins to resist your folds. Flip the dough over and pull it into a round ball.
Flour a proofing basket or a medium bowl and place your loaf into it seam-side down. Cover with a tea towel and let rise another 30 minutes or so while you preheat the oven.
HEAT THE OVEN AND BAKE
While bread is rising, place an empty dutch oven (with the lid on) in your oven and heat to 460 degrees Fahrenheit.
When the oven is hot, you’re ready to go! Use oven mitts to pull the dutch oven out and remove the lid.
Lay a piece of parchment paper down on your counter or cutting board (optional – it makes transferring the bread easier!)
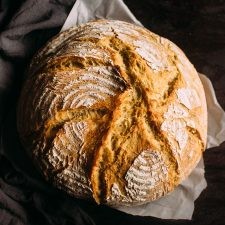
Tip your bread dough gently out of the proofing basket onto the parchment paper. Make sure the seam side is up this time – this is what will create those beautiful cracks on top of the bread!
VERY CAREFULLY (without burning yourself!) use the sides of the parchment to lift the bread up and place it into the hot Dutch oven.
Put your oven mitts back on, place the dutch oven lid back on the pot, and slide the whole thing back into your hot oven.
Cook bread for 30 minutes.
After 30 minutes, remove the lid from your dutch oven. The bread should be taller, crusty, and very lightly browned. Continue cooking the bread, uncovered, for 10-15 minutes more until the bread has deepened in color and you have a beautiful brown crust.
When bread is done, use oven mitts to pull the pot out of your oven.
Use a long spatula or the corners of your parchment paper to lift the bread out of the dutch oven and onto a cooling rack. Let cool for at least 30 minutes before cutting into it.
Slice, slather with butter, and enjoy!
ALT baking - baguettes
When first proof is done, cut into 3 pieces and roll out into long baguette shaped dough. Let rest in a baguette shapper or similar. Right before putting in oven, slash baguettes with a sharp blade or razor at a diagnal. Sprinkle water over the baguettes. Bake in a baguette oven (ideal) or on the baguette shapper, or on a baking sheet.
Notes
How to measure flour: If you have a kitchen scale, please use it! Measuring by weight is MUCH more accurate than measuring by volume (with cups) and will give you more consistent bread. That being said, you can certainly make great bread without a kitchen scale! To measure flour in cups: If you measure flour by dipping your cup straight into the bag or bin and shaking off the excess, plan to use about 2 ½ cups of flour. If you measure by stirring the flour with a spoon or scoop before scooping it into a measuring cup and leveling it off, plan to use about 3 cups of flour. You can always add more flour if you need to – just be aware that this is a relatively slack (wet) dough, so it will be a bit shaggy and sticky at first (but it will smooth out and become more elastic as it rises and again as you shape it!)